
Tutorial on Scripting Device

For a better understanding of this tutorial, please also consult the documentation concerning the SiteKiosk Object Model. Please note that SiteCafe offers compareable but enhanced features.
Step 1: General Matters and Database Structure
Step 2: Server Sided Scripts and Development of the Required PHP Script
Step 3: Creating the Required User Dialogs and Overview of Scripting Device
Step 4: Creating the Necessary JavaScripts (SiteKiosk Object Model)
Step 5: Possible Implementations and Expansions

Step 1: General Matters and Database Structure
 Goal of this Tutorial/ Requirements Goal of this Tutorial/ Requirements
 The goal this tutorial tries to achieve is to enable you to set up your own server-account payment device in a few easy steps.
This tutorial relies on the free tools MySQL, phpMyAdmin and a Web server including PHP support (PHP Version >= 4.1.0). For this example, we assume that the server has been configured and is up and running. What you will also need is SiteKiosk version 5.0.32 or higher (available for free download).
The tutorial requires you to have some basic knowledge of PHP and SQL as well as a sound knowledge of HTML and JavaScript. It would also be advantageous if you had worked with the SiteKiosk Object Model before.
We will now turn to the structure of the device and the task it is supposed to fulfill.
 Setting Our Goal (What Do We Want to Achieve?) Setting Our Goal (What Do We Want to Achieve?)
We want to create a payment device that will prompt the user to enter her name and password in a dialog box.
The dialog will then contact a server and transmit information on the current account balance as well as a few other specific information such as the user's full name and her own Start Page to SiteKiosk.
The dialog establishes contact with the server using the new HTTP Post Object of the SiteKiosk Object Model.
 Creating the Database Structure Creating the Database Structure
Let's start with the database that will provide the information for the device.
We will try and keep the tables as simple as possible.
First, we will create a new database using phpMyAdmin and give it the appropriate name of "NoCoinSys".
Although you can, of course, choose any name you like, make sure you to decide on one that will not confuse you when we deal with the examples. Otherwise you might end up using information from the wrong database or table.
|
Table: ncs_user - User Information
|
CREATE TABLE ncs_user (
  pk int(11) NOT NULL auto_increment,
  name varchar(80) default NULL,
  last_name varchar(80) NOT NULL default '',
  login_id varchar(30) NOT NULL default '',
  password varchar(30) NOT NUll default '',
  startpage varchar(255) default NULL,
  PRIMARY KEY (pk),
  UNIQUE KEY pk(pk)
);
|
The table "ncs_user" contains our user information. You can conveniently enter the SQL command into the SQL field in phpMyAdmin.
In order to initiate the login process we will demand the "login_id" as well as the field "password". Provided this user exists, we will then send his or her full name as well as the specified Start Page to SiteKiosk. You will learn more about this in the second part of the tutorial.
|
Table: ncs_account - User Account
|
CREATE TABLE ncs_account (
  pk int(11) NOT NULL default '0',
  value float NOT NULL default '0',
  PRIMARY KEY (pk),
  UNIQUE KEY pk(pk)
);
|
The user account with its attribute "pk" refers to the attribute "pk" of the user information.
The attribute "value" provides the actual information on the user's current balance. Please note that SiteKiosk will always transmit the balance information in four decimal places, which provides for higher precision in the transaction.
So far, we have developed an understanding for the general structure of the database and have also outlined the structure of the database we want to use. The user will later on be able to save his or her Start Page on the server in order to look at it on our terminals. In addition, the user will also possess an account where his or her current balance will be stored.

Step 2: Server Sided Scripts and Development of the Required PHP Script
Goal Definition for Step 2
This part of the tutorial deals with the creation of a PHP script which will examine the user information sent from the terminal in order to send back extended user information or to report an error.
Since JavaScript provides an easy way for you to analyze the emitted page, the values that are sent back will be separated by the pipe symbol "|".
In order to make things easier for the JavaScript, we will start off by responding with a wrong value (negative numbers) caused by an unsuccessful attempt to log on. If the logon attempt was successful, you will find a positive number instead, e.g.
|
A return value from the server
|
1|Authentication successful|50|John|Doe|http://www.sitekiosk.de/
|
The value comprises the following elements:
Error Code|Message|Credit|First Name|Last Name|Start Page
This information will help the JavaScript to initialize the account later on. Should the logon attempt fail, we will leave out everything after "Message" and set the "Error Code" to a negative value.
The PHP Script
Let's now finally turn to the PHP script.
The first thing we have to do is to initialize the database by means of the commands
|
mySQL Initialization
|
$link = mysql_connect("SQLServerURL", "SQLUser", "SQLPassword");
mysql_select_db("NoCoinSys");
|
We must not forget to adjust the "SQLServerURL," "SQLUser" and "SQLPassword" to the settings the server uses.
Having done so, we can now turn to the actual problem, which is to check the user information and the fields sent by the script.
We will tackle this problem by making an SQL request which will retrieve user name and password directly from the table "ncs_user".
|
Checking the transmitted account
|
$sql = "SELECT * FROM ncs_user WHERE
        login_id='" . $_POST["login_name"] . "' AND
        password='" . $_POST["login_password"] . "'";
$res = mysql_query($sql);
|
We will post "$_POST["login_name"]" and "$_POST["login_password"]" to this page using our JavaScript.
Thus, all that remains for us to do is to check the number of data sets provided through "$res" to be able to tell whether this user exists and if the entered password is valid:
|
Transmitting user information (possibly an error)
|
if (@mysql_num_rows($res) == 1)
{
	$userobj = mysql_fetch_object($res);
	$sql = "SELECT * FROM ncs_account
	        WHERE pk='" . $userobj->pk . "'";
	$res = mysql_query($sql);
	if (@mysql_num_rows($res) == 1)
	{
		$accountobj = mysql_fetch_object($res);
		print "1|Authentication successful|"
		        . $accountobj->value . "|"
		        . $userobj->name . "|"
		        . $userobj->last_name . "|"
		        . $userobj->startpage;
	}
	else
		print "-3|Error: No account found";
}
else
	print "-2|Error: Authentication unsuccessful";
|
Admittedly, this seems like a lot to swallow all at once, but you will see why this information is essential.
As mentioned earlier, the row 1 › checks on the number of data sets that have to be exactly equal to one in order for us to find a valid user.
The "@" sign preceding the command is only there for suppressing potential error messages from PHP that might confuse our JavaScript.
Next, we will go to line 3 › to squeeze the information about this one user into the variable "$userobj". In the following line, we will create the SQL query which will retrieve our account from the correct table. Thus, the two attributes called "pk" have to be identical for the same user in both tables.
The examination of the number of data sets remains the same for this account as well. If we were successful so far, we can now say that such a user exists and that he or she has an account balance which we can transmit to the script now.
print "1|Authentication successful|"
        . $accountobj->value . "|"
        . $userobj->name . "|"
        . $userobj->last_name . "|"
        . $userobj->startpage;
|
This format is in accordance with the one we specified beforehand. We will later on be able to evaluate this line in the script.
This format makes it very easy for us to deal with errors: we will receive one line containing the error code as well as the error number (negative). For example:
print "-3|Error: No account found";
|
Implementing the "SetMoney" Function
Let's take a closer look at the script once more. What is it capable of doing so far?
We can transmit the logon data to the page and, in return, we receive the user's full name and current balance as well as the Start Page.
However, unfortunately Payment Module devices don't function in such a simplistic way. What is more, we cannot yet set a new account balance, either.
For instance, in connection with server-sided devices you might come across the problem that the connection will be disrupted before logout and that, therefore, the current balance on the server will remain unaltered.
In order to prevent this from happening we have implemented devices into SiteKiosk that you can use to withdraw amounts every single minute. These devices access an account within SiteKiosk and make withdrawals from an external account once every minute. In doing so, they always set the account balance stored on the server to the new value. This will always keep your loss as low as possible in the event of a complete system failure.
As a consequence, we need the script to provide a new function that allows us to alter the account balance on the server.
What we need to do is slightly modify the script because every time we call it now it will prompt us to provide logon information.
We will have to insert a new field into the form that the JavaScript posted in order to be able to distinguish between the regular login and the SetMoney function. This field has to contain information about the action that had just been executed by the script.
Let's call it "action". Before we send back the user information we have to make sure to insert another "if" condition which is supposed to check what action has just been executed:
[...]
	$sql = "SELECT * FROM ncs_account
	        WHERE pk='" . $userobj->pk . "'";
	$res = mysql_query($sql);
	if (@mysql_num_rows($res) == 1)
	{
		if ($_POST["action"] == "login")
		{
			$accountobj = mysql_fetch_object($res);
			print "1|Authentication successful|"
			        . $accountobj->value . "|"
			        . $userobj->name . "|"
			        . $userobj->last_name . "|"
			        . $userobj->startpage;
		}
[...]
|
Now inquire if the user simply wants to set her new account balance:
[...]
		else if ($_POST["action"] == "setmoney")
		{
			$sql = "UPDATE $accountable SET value='" .
			    ereg_replace(",", ".", $_POST["MoneyBack"]).
				"' WHERE pk='" . $userobj->pk . "'";

			$res = mysql_query($sql);
			if ($res)
			  print "1|Account successfully set|" .
			    ereg_replace(",", ".", $_POST["MoneyBack"]);
			else
			  print "-1|Error: Internal Error";
		}
[...]
|
The following line needs some more explanation:
ereg_replace(",", ".", $_POST["MoneyBack"])
|
While most scripting and programming languages save numerical values using a ".", the functions the Payment Module employs always go back one Currency value which contains a comma (at least on German operating systems).
Since this line replaces this comma by a dot, it ensures that the value can be saved in the database by means of the SQL inquiry.
 Conclusion of Step 2 Conclusion of Step 2
Now we have completed our task to set up the server in a way that we can manage our user account with the help of the JavaScript part that we are about to develop now.
The server is now capable of transmitting to the script the information about the user, the current account balance as well as on the Start Page. In addition, you can use the variable "$_POST["action"]" to specify that you want to set the current balance to the new value that is to be found in the variable "$_POST["MoneyBack"]".
View the complete userpost.php script

Step 3: Creating the Required User Dialogs and Overview of Scripting Device
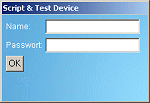
 We will need a small HTML dialog within the SiteKiosk browser which will prompt the user to enter her user name and password. We will need a small HTML dialog within the SiteKiosk browser which will prompt the user to enter her user name and password.
After that, we will take a closer look at the ScriptDevice and learn more about the logic behind the SiteKiosk payment devices.
Input dialog box for the user
Let's start with the HTML dialog box.
This box must contain two text INPUT fields, a button the user can press to submit the form, and another field in which the user can find her full name after the successful completion of the form:
|
HTML Login Dialog
|
<table style='width:100%;'>
  <tr>
    <td>
      <table>
        <tr id='trName'>
          <td style='color:white;'>Name:
          <td><input type='text' name='edtLoginName'>
        <tr id='trPW'>
          <td style='color:white;'>Password:
          <td>
            <input type='password' name='edtLoginPassword'>
        <tr id='trOK'>
          <td colspan='2'>
            <input type='button' value='OK' onClick='FormSubmit();'>
        <tr>
          <td style='color:white;' id='LogInfo' colspan='2'>
      </table>
    </td>
  </tr>
</table>
|
So much for this part. The user can now enter her name and password and submit this information.
Here is a quick overview of the SiteKiosk ScriptDevice
SiteKiosk provides a comprehensive library of scripts which makes it possible, for example for us in this tutorial, to develop our own payment device.
Let's take an in-depth look into these scripting and testing devices as well as their functions and attributes:
|
ScriptDevice.
|
DeviceName [String, read only]
Testmode [Boolean, read only]
AccountEnabled [Boolean]
Balance [Currency, read only]
Volatile [Boolean]
RetransferEnabled [Boolean]
Credit(Currency Value, Boolean bDirect)
Debit(Currency Value, Boolean bDirect)
|
As the first two attributes are irrelevant for our example, let's move on to the other ones.
"AccountEnabled" allows for the use of the Payment Module's internal account with this payment device. If enabled, the Payment Module will also perform bookings on the account the device uses.
"Balance" contains the amount currently available for the device. The amount is read only and can be altered by the functions "Credit" and "Debit".
"Volatile" describes the device's behavior. If this value is true, the account balance of the device can change spontaneously just like our example suggests if, for example, the connection to the server has been severed.
"RetransferEnabled". If this value is set to true, the device will manage the retransfer of amounts all by itself. For more information, read on about Events.
As the name already suggests, the function "Credit" credits amounts to an account, whereas the function "Debit" debits amounts from an account. The parameter "bDirect" indicates whether the amount is supposed to end up on the Payment Module account or on the account of the device.
The following events will be received by the ScriptDevice:
|
ScriptDevice.
|
OnSiteCashDebit(Currency AmountPayed, Currency NewBalance)
Boolean OnCheckRetransfer(Currency Amount)
Boolean OnRetransfer(Currency Amount)
|
The event "OnSiteCashDebit" will receive every debiting process coming in from the Payment Module. This is why it is ideal for our purposes because the Payment Module makes a deduction every single minute and, thereby, allows our device to inform the server about the new account balance.
Prior to retransferring the amounts, "OnCheckRetransfer" will ask all of the devices if they agree to the transaction. Since there is nothing that speaks against this in our case, the value is set to "return true;".
"OnRetransfer" will then perform the actual retransfer.
Since we also have to be able to make inquiries to the server, why don't we have the HTTP post object do the job for us.
This object provides the great advantage that it entirely relies on script and thereby saves you the pain of compiling cumbersome forms. What is more, the fact that it passes the emitted page on to you in the form of a variable makes this object extremely powerful.
This command retrieves the network object we want to use to create a post object:
|
SiteKiosk.Network.
|
CreateHTTPPost()
|
This concludes the creation of our HTTP post object and we can now access the provided functions and events:
|
HTTP Post
|
AddParameter(String Name, String Value)
Submit(String strURL)
OnPostComplete(HResult Success, String ReturnValue)
|
"AddParameter" adds a new parameter to the form we want to send. It is called "Name" and carries the value "Value".
With the help of "Submit" and the desired URL the form can then be sent on its way.
The event "OnPostComplete" will fire as soon as the server has responded. If the parameter "Success" is higher than or equal to zero, the request has been successful. If the values are lower, an error has occurred (server timeout or some such). The string "ReturnValue" contains the returned page that we have to analyze.
Practical Procedure
The information above will suffice for the creation of our script device.
All we have to think about now is what we actually want our device to do on the client-script side and base the definition of our functions on these considerations.
As we want the user to submit the form with his or her information, we already know what the function "FormSubmit" has to be like. This function will read out the INPUT fields and provide the necessary data for our server script.
The server will then send its response including the user information ("OnPostComplete").
We evaluate the user information with the function "ParseReturnValues".
We said earlier that we wanted to make a deduction from the server's account once every minute while the user is surfing. We achieve this goal by having our script attach itself to the event "OnSiteCashDebit" because it will then be able to inform the server about the changed account balance.
The user will be given the chance to logout and to thereby recredit the minute he or she just started to the account stored on the server (Event "OnRetransfer").
Conclusion of Step3
We have come to an understanding of the required components of the SiteKiosk Object Model and have gained some insight into the behavior of the payment devices. We now know that it is possible to control the logout behavior of the devices and that the devices have an account of their own at their disposal.
We have also got to know the HTTP post object and are aware of the fact that it can be a powerful tool for controlling SiteKiosk when it is used in connection with web servers.
Our device is now completely defined so that we can move on to creating the script itself.

Step 4: Creating the Necessary JavaScripts
We have now gathered all the information we need to proceed to the last part of this tutorial: the JScript controlling our device.
So, let's get started.
General Functions
|
Initialization
|
<script type='text/jscript'>
var PostObj = new Object();
var UserObj = new Object();
var ServerPage = "http://YOUR.SERVER/page.php";

var openposts = 0;

function InitDialog()
{
  window.external.InitScriptInterface();

  ScriptDevice.AccountEnabled = true;
  ScriptDevice.RetransferEnabled = true;
  ScriptDevice.OnCheckRetransfer = OnCheckRetransfer;
  ScriptDevice.OnRetransfer = OnRetransfer;
  ScriptDevice.OnSiteCashDebit = OnSiteCashDebit;

  PostObj = SiteKiosk.Network.CreateHTTPPost();
  PostObj.OnPostComplete = OnPostComplete;
}
</script>
<body onload="InitDialog();">
[...]
|
For our example, we require two global objects and two global variables:
"PostObj" › will be assigned to a new HTTP post object in InitDialog.
After logging in, we will save our user information to "UserObj" ›.
"ServerPage" › contains the URL for the PHP script we know from part 2, and through "openposts" › we will count the attempts to debit amounts from our server once every minute. After the third unsuccessful attempt to log on, we will log out the user because otherwise we cannot be sure that we are not dealing with an unauthorized attempt to access the server.
FormSubmit
Try and remember something we mentioned earlier: the logout dialog features a button that, when clicked on, calls the function "FormSubmit":
|
FormSubmit()
|
function FormSubmit()
{
  PostObj.OnPostComplete = OnPostComplete;
  PostObj.AddParameter("login", "SiteKiosk");
  PostObj.AddParameter("action", "login");
  PostObj.AddParameter("login_name", edtLoginName.value);
  PostObj.AddParameter("login_password", edtLoginPassword.value);

  UserObj.name = edtLoginName.value;
  UserObj.password = edtLoginPassword.value;

  PostObj.Submit(ServerPage);
}
|
The first few lines assign the event once again because we will use the same object both for logging out and the minute-by-minute deduction. These processes differ from one another in that we cannot treat them in the same way (if we go over the server sided script in our minds, we will realize that there are two different ways for us to contact the server: Login and SetMoney).
The other elements of the function set the parameters we will evaluate on the server and send the form to the URL of the server.
OnPostComplete
This function is only there for calling the evaluation function and for reinitializing the PostObj in order to prevent potential overlaps.
ParseReturnValue
This function will evaluate the page we received from the server.
It is invoked by two functions: OnPostComplete and OnREPostComplete. The latter function is primarily used by the server for error emission.
Let's take a closer look at the first part of the function
|
ParseReturnValue(value, is_retransfer)
|
function ParseReturnValue(value, is_retransfer)
{
  var RetArr = value.split("|");

  if (is_retransfer == false)
  {
    if (RetArr[2] != null)
    {
      UserObj.RetVal = RetArr[2];
      UserObj.RetName = RetArr[3];
      UserObj.RetLastName = RetArr[4];
      UserObj.RetStartPage = RetArr[5];
    }
    else
      UserObj.RetVal = 0;
  }
  else
    UserObj.RetVal = 0;
[...]
|
According to the definition of our return value, we can split up the value into an array using "value.split("|")". This array will either contain the user information or the error returned by the server.
In case the user only wants to log on rather than log out, we will have to equip our "UserObj" with the user information given in the array.
Next we will fill the values that were transmitted in any event even if an error has occurred:
[...]
UserObj.ReturnValue = value;
UserObj.RetCode = parseInt(RetArr[0]);
UserObj.RetMsg = RetArr[1];
if (UserObj.RetCode < 0)
alert(UserObj.RetMsg);
else if (UserObj.RetVal > 0 && is_retransfer == false)
{
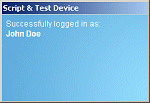
LogInfo.innerHTML = "Successfully logged in as:<br><b>"\
+ UserObj.RetName + " " + UserObj.RetLastName + "</b>";
trName.style.display = "none";
trPW.style.display = "none";
trOK.style.display = "none";
CreditDebit(UserObj.RetVal, true);
if (UserObj.RetStartPage != "")
SiteKiosk.WindowList.MainWindow.SiteKioskWindow.\
SiteKioskWebBrowser.Navigate(UserObj.RetStartPage, true);
}
}
|
Now, we will check if there was an error (row 5 ›). If this is the case, the server will show an info box with the error message.
However, if everything went according to plan, we will switch from logon view to the message that the user managed to log on successfully, and we will also display his or her name.
The transmitted amount will be credited (row 16 ›), and the user will be taken to the Start Page he or she specified:
SiteKiosk.WindowList.MainWindow.SiteKioskWindow.\
SiteKioskWebBrowser.Navigate(UserObj.RetStartPage, true);
|
Although this construction may seem a little unusual, it provides the only possibility to access the SiteKiosk browser from a non-skin window.
CreditDebit
A slightly altered function of the regular testing mode dialog that ships with SiteKiosk represents the "core" of our payment device:
|
CreditDebit(fValue, bCredit)
|
function CreditDebit(fValue, bCredit)
{
  fValue = parseFloat(fValue);
  if (bCredit)
    ScriptDevice.Credit(fValue, false);
  else
    ScriptDevice.Debit(fValue, false);
}
|
The third row contains a conversion of the string we received from the server into a float. This conversion is necessary because otherwise we could not credit the internal JScript number into the SiteKiosk Payment Module.
The amount will subsequently either be credited to or debited from the account of the ScriptDevice.
OnSiteCashDebit
As mentioned earlier, we will have our device refresh the account balance on the server once every minute using this function.
Should this process fail three times in a row, we will log out the user (reset the account balance to zero) and notify him or her that something went wrong:
|
OnSiteCashDebit(payedamount, newbalance)
|
function OnSiteCashDebit(payedamount, newbalance)
{
  if (openposts < 3)
  {
    if (UserObj.name != null)
    {
      PostObj.OnPostComplete = OnSCDPostComplete;

      PostObj.AddParameter("login", "SiteKiosk");
      PostObj.AddParameter("action", "setmoney");
      PostObj.AddParameter("MoneyBack", newbalance);
      PostObj.AddParameter("login_name", UserObj.name);
      PostObj.AddParameter("login_password", UserObj.password);

      PostObj.Submit(ServerPage);

      ++openposts;
    }
    else
      return false;
  }
  else
  {
    OnREPostComplete(true, "");
    ScriptDevice.Debit(ScriptDevice.Balance, false);
    alert("The server timed out, please call\
      support personell!");
    openposts = 0;
  }
}
|
In the first part, the PostObj is only assigned a new function that is to be invoked at the end of the search process: OnSCDPostComplete, which is actually only there for decrementing the counter of the open posts per return value.
In addition, the parameter "action" will deliver a message from the PostObj, which is set to "setmoney", telling the server that we want our balance to be credited to the server account.
After submission the counter will be increased by one to make it possible for us to check precisely during the next transaction process how many posts have not come back yet.
Afterwards, in the second part, we will know that something went wrong on the server and will, therefore, log out the user by invoking the function OnREPostComplete. We will, furthermore, also deduct the current credit balance and will notify the user about the error.
OnSCDPostComplete
|
OnSCDPostComplete(success, returnvalue)
|
function OnSCDPostComplete(success, returnvalue)
{
  openposts--;
}
|
Logout Procedure
Now we have already reached the final part of our tutorial: teaching our payment device how to log out all by itself and how to transmit the exact remaining credit amount to the server.
OnCheckRetransfer
As we have already learned in theory, our payment device will have to respond to two events when logging out: OnCheckRetransfer and OnRetransfer.
OnCheckRetransfer is fairly simple to understand. If the device consents to the logout procedure, the return value will be "true". Otherwise, it will be "false". This allows us to keep better control of the logout procedure and to cancel it if necessary.
Our device consents to the logout procedure:
|
OnCheckRetransfer(amount)
|
function OnCheckRetransfer(amount)
{
  return true;
}
|
OnRetransfer
The actual logout procedure will follow after the successful examination of the data. We want to deal with the response from the server in a separate function: OnREPostComplete.
With the help of the server function "setmoney" we will set the account balance to the remaining amount:
|
OnRetransfer(amount)
|
function OnRetransfer(amount)
{
  PostObj.OnPostComplete = OnREPostComplete;

  PostObj.AddParameter("login", "SiteKiosk");
  PostObj.AddParameter("action", "setmoney");
  PostObj.AddParameter("MoneyBack", ScriptDevice.Balance + amount);
  PostObj.AddParameter("login_name", UserObj.name);
  PostObj.AddParameter("login_password", UserObj.password);

  PostObj.Submit(ServerPage);

  ScriptDevice.Debit(ScriptDevice.Balance, false);

  return true;
}
|
Row 11 › will then submit the form and the user will be logged out because we will set the account of our device to zero.
This function has to return "true" because otherwise SiteKiosk will not realize that logging out succeeded.
OnREPostComplete
With this function we react to the successful logout (server responded). We will now reinitialize our objects and give the user opportunity to log on again:
|
OnREPostComplete(success, value)
|
function OnREPostComplete(success, returnvalue)
{
  ParseReturnValue(returnvalue, true);

  PostObj = SiteKiosk.Network.CreateHTTPPost();
  PostObj.OnPostComplete = OnPostComplete;

  edtLoginName.value = "";
  edtLoginPassword.value = "";
  LogInfo.innerHTML = "";
  UserObj = new Object();

  trName.style.display = "block";
  trPW.style.display = "block";
  trOK.style.display = "block";
}
|
In row 3 › we will call ParseReturnValue again in order to have the server report potential errors.
After that we will reset the variables and bring back the logon table to its initial state.
Conclusion of Step 4
We have now developed a fully functional payment device.
This device will react to all of the given events, it will make minute-by-minute deductions of the amount the Payment Module specified and will leave it up to the user to decide when he or she wants to log out.
The user will be notified about any server failures and will be logged out for the time being.
Click here for a complete example of a ServerPayed HTML page.
Of course, there are many different ways for you to implement this dialog into SiteKiosk.

Step 5: Possible Implementations and Expansions
|
HTTP Post Object
|
String Referer;
AddParameter(String Name, String Value);
SetAuthInfo(String Name, String Password);
Submit(String bstrURL);
Abort();

OnPostComplete(HResult Success, String ReturnValue);
|
|
ScriptDevice.
|
DeviceName [String, read only]
Testmode [Boolean, read only]
AccountEnabled [Boolean]
Balance [Currency, read only]
Volatile [Boolean]
RetransferEnabled [Boolean]
Credit(Currency Value, Boolean bDirect)
Debit(Currency Value, Boolean bDirect)

OnSiteCashDebit(Currency AmountPayed, Currency NewBalance);
Boolean OnCheckRetransfer(Currency Amount);
Boolean OnRetransfer(Currency Amount);
Boolean OnLogoutButtonPressed();
OnPropertyChange();
OnBalanceChange(Currency NewBalance);
|
As you can see, a few events that have not been mentioned before have been added to the original setup.
"OnLogoutButtonPressed" will be invoked right after the user has pressed the logout button, i.e. even before the retransfer.
"OnPropertyChange" - One of the following attributes will have changed: AccountEnabled, RetransferEnabled or Volatile.
Whenever "OnBalanceChange" fires, the internal account balance will have changed.
We hope that this tutorial was able to provide you with a good overview of the new scripting functions we have implemented into SiteKiosk.
|
 Back to top Back to top
© 1997-2011 PROVISIO - Aventura, USA & Muenster, Germany - SiteKiosk DevTeam
|
|
