Home > Funciones de Pago > Dispositivos Soportados > Interfaz HW200 USB
Interfaz HW200 USB
El dispositivo de pago HW200 Universal USB Interface fue diseñado inicialmente para funcionar junto con el selector de monedas Microcoin QL Coin Acceptor (no podemos garantizar que otros medios de pago sean compatibles pero se puede provar con la versión de evaluación). Puede operar hasta con cuatro dispositivos al mismo tiempo.
Nota:
Los nuevos modelos ya no permiten conectar varios dispositivos.
Puede conseguir este dispositivo desde
Hemisphere West-Las Vegas, Las Vegas, USA.
A continuación se muestra la información técnica del fabricante (en inglés).
1.1 Hardware
- HW200 USB Interface, power adapter and connecting cable(www.hwlvegas.com)
- Microcoin QL Coin acceptor and connecting cable (www.hwlvegas.com) or other supported payment device.
- Up-to-date PC with an open USB-Port
1.2 Software
- Windows 7, 8, 10
- Internet Explorer 10, 11
- SiteKiosk con licencia para funciones de pago
2. Instalación de Hardware
2.1 Connect the HW200 to a USB port on the computer
Plug the included USB cable into an available USB port of your computer and connect the other end with the HW200 (port labeling: USB).
2.2 Connect the HW200 to the coin acceptor
As a next step, connect the Microcoin coin acceptor (or another supported payment device) to the HW200 device using the included cable (port labeling: Device Input).
Caution:
Pay attention to the polarity of the plug. Insert the plug into the coin acceptor and the HW200 that way that the plug's pins fit exactly into the corresponding notches.
2.3 Power Supply
The payment device HW200 has to be powered by an external power supply unit which usually ships with the device. Plug the adapter into the corresponding port (port labeling: 12VDC) of the HW200.
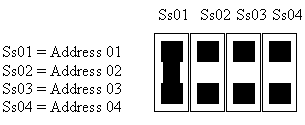
2.4 Setting up several devices
If you want to operate several devices at the same time (up to 4), you will need a USB hub and the corresponding number of HW200 devices including the payment device you connected to it. Each individual device can only be detected if you adjusted the jumpers for the bus address accordingly. You will find the jumpers underneath the flap on the bottom site of the HW200. Adjust the jumper settings as follows:
Make sure that no setting is used twice. Each individual device will then be detected in the configuration tool by its corresponding ID (1-4).
3. Configurando el HW200
Note:
If you only want to deploy one Microcoin QL Coin Acceptor, you can also configure the device directly with the help of the Microcoin QL configuration dialog.
3.1 General
After installing SiteKiosk and connecting the payment hardware to your computer, you can now configure the device with the help of the SiteKiosk configuration tool. On the payment devices page, select the entry
Interface: HW200 USB from the list of available devices then click the
Customize button to configure and activate the device.
The icon next to the device will turn from red to greeen after the device has been activated.
3.2 Setting up connected devices
The dialog to configure a connect HW200 device is in the English language.
SiteKiosk automatically recognizes on which of the 4 available IDs a device is connected to. If it has detected a device, SiteKiosk will display a USB icon including a cable next to the ID. If it could not detect a device, SiteKiosk will only show a USB icon. If your device could not be detected, please check if you have connected everything correctly. Also, make sure that the PSU is 12 Volts. If, after these steps, the system is still unable to detect the device, please
contact us.
Now the connected devices must be configured. There should be a checkmark next to
Enable. Under
Device, select the connected device (usually Microcoin QL). Under the
Configuration drop-down, select the country in which the currency you are using is valid. If the country of your choice is not listed, you can re-program an already existing configuration. Click
here to learn more.
With the text box
Image width for payment dialog you can set the width of the images SiteKiosk will display to the users to inform them about the accepted currencies. Please note, that the default values normally already optimized for size. Make sure that the checkbox
Device supports escrow mode is
not checked
.
3.3 Channels
In the lower section labeled Channels, you will find the channels for currency recognition. A green dot on the row marks an activated channel, a red dot marks a deactivated one. By double-clicking a channel or clicking on Configure you can adjust and activate the channel. Activate or deactivate a channel by checking the box labeled Enable Channel. Under Value, enter the amount, i.e. 25 US cents, you want the channel to credit to the user's account every time the coin acceptor detects that a 25 cent coin has been inserted (if you want to make the coin acceptor accept other coins on this channel as well, please read this section). Under Display Text, enter the alternative text that will be shown to the user in the event that no image for the chosen amount is available. If an image is available, you can provide the corresponding file path under Image. You will find the images (.png format) that ship with SiteKiosk in the directory ..\SiteKiosk\SiteCash\html\images. You can, however, also use images that you created. As a last step, click on OK.
3.4 Simulator
Now you can start testing your configuration. In order to do so, click on Simulator. Next, press the Enable button. The Status display will now switch to Activated. Please do not change anything under Escrowed Money. Now, you can test the connected device. Insert a coin, and the amount will be added under Money depending on the value you specified for the corresponding coin channel. The coin acceptor is now ready for use.
3.5 Accepting other coins
If you want Microcoin QL to accept other coins as well, you will have to make it recognize them first. If you connected the Microcoin QL Coin Acceptor via the HW200, please proceed as follows:
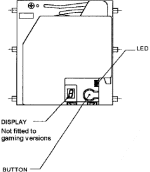
Click on <em>Simulator</em> in HW200's configuration dialog box and then on <em>Enable</em> in the subsequent dialog box. Now, all LEDs should be glowing green (see fig.).
Now, press the round button below the LED (see fig.) quickly three times in a row. The LED will start flashing, and on the left-hand side of the display, you will now be shown a channel that you can train. If you want to change the channel, press the round button. After you have selected the channel you want, insert the coin you want the channel to recognize 10 times in a row. We recommend you use different coins of the same value in order to detect variances in that type of coin. The LED will stop flashing as soon as you have finished entering the coins ten times. Next, press the round button again. The LED will now glow a constant green again indicating that the coin acceptor has now been trained. You can now exit the HW200 Simulator dialog box.
4.1 HW200 or connected devices are not being detected
- Check the connection between HW200, the connected devices and the PC.
- Check if the power supply unit has been plugged in.
4.2 Accounting for incorrect amounts
- Make sure you entered the correct amounts for the individual channels in the Configuration tool.
- Over time it is possible that the coins will not be recognized properly and this is why incorrect amounts are being credited. If necessary, train the device to recognize that amount again.
Vea también
Volver arriba